
I was surfing through Pinterest and the sites they lead to and came across a cute little heart needle book. I could see some potential for using applique paper and stiff bag interfacing to make the process suit me.
So, instead of cardboard for the covers I traced my heart onto freezer paper then ironed it onto the piece of stiff handbag interfacing I had on my sewing table. I cut it out then reused the freezer paper to make a second one. I wanted to fuse the fabric to these pieces so I cut out two squares of fusible applique paper and ironed them to the wrong side of my cover fabric then cut around them.
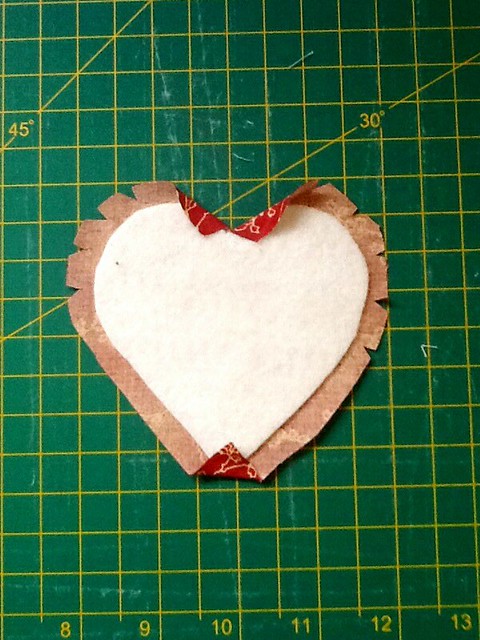
Using my teflon mat (it is actually a non stick teflon sheet meant for the frying pan) I ironed the square of fabric on top of the heart shaped interfacing. I peeled it off the teflon mat and trimmed around it to leave a 1/4 inch allowance to turn in. I clipped and turned the allowance under. This part wasn't quite as tricky as I thought it might be. I did burn my fingers twice but I didn't get any glue on the iron. It sticks in place beautifully and makes sewing the lining and cover together easy.

I am a machine sewer rather than a hand sewer but it would be possible to make the cover using buttonhole stitch. I also struggle to tizzy things up. I love to look at all the beautiful embroidery and embellishments others use on their projects but can't quite get it all to come together. What I managed on the front of this needle book is about as good as it gets in my craft room but it does lend itself to a nice stitchery on the front or more buttons and beads or applique.
When I cut out the felt hearts I just reused the freezer paper heart two more times. I then trimmed it down to make the two inside hearts. I used the one piece 6 times. I am so glad I discovered freezer paper. When I did I bought a whole role of it. It will probably last me the rest of my life.
Now I have a little needle book to mind a needle when I bring one down to stitch something like a button and it won't get lost in the lounge. The one on Pinterest had a ribbon to tie on the right hand side but I am not much a tying ribbons on needle books.


I know what a pain it is to find just what you need in your carefully filed patterns or 'just draw a heart shape' so I have included the half heart image the same size as I used. Draw a line and trace half onto your freezer paper. Fold on the line and cut out along the half heart line so it ends up symmetrical. Heart shape PDF.
I have put together a few basic photos and instructions in a flickr set. You can look at it here.
If you pin one of the last two pictures from this blog you can always find it later or you can go to the photo set and pin that. Hover the mouse over the image to see the pin button.
Comment options
Flickr
Pinterest
Happy Quilting and Crafting,
Val
So, instead of cardboard for the covers I traced my heart onto freezer paper then ironed it onto the piece of stiff handbag interfacing I had on my sewing table. I cut it out then reused the freezer paper to make a second one. I wanted to fuse the fabric to these pieces so I cut out two squares of fusible applique paper and ironed them to the wrong side of my cover fabric then cut around them.
Using my teflon mat (it is actually a non stick teflon sheet meant for the frying pan) I ironed the square of fabric on top of the heart shaped interfacing. I peeled it off the teflon mat and trimmed around it to leave a 1/4 inch allowance to turn in. I clipped and turned the allowance under. This part wasn't quite as tricky as I thought it might be. I did burn my fingers twice but I didn't get any glue on the iron. It sticks in place beautifully and makes sewing the lining and cover together easy.
I am a machine sewer rather than a hand sewer but it would be possible to make the cover using buttonhole stitch. I also struggle to tizzy things up. I love to look at all the beautiful embroidery and embellishments others use on their projects but can't quite get it all to come together. What I managed on the front of this needle book is about as good as it gets in my craft room but it does lend itself to a nice stitchery on the front or more buttons and beads or applique.
When I cut out the felt hearts I just reused the freezer paper heart two more times. I then trimmed it down to make the two inside hearts. I used the one piece 6 times. I am so glad I discovered freezer paper. When I did I bought a whole role of it. It will probably last me the rest of my life.
Now I have a little needle book to mind a needle when I bring one down to stitch something like a button and it won't get lost in the lounge. The one on Pinterest had a ribbon to tie on the right hand side but I am not much a tying ribbons on needle books.


I know what a pain it is to find just what you need in your carefully filed patterns or 'just draw a heart shape' so I have included the half heart image the same size as I used. Draw a line and trace half onto your freezer paper. Fold on the line and cut out along the half heart line so it ends up symmetrical. Heart shape PDF.
I have put together a few basic photos and instructions in a flickr set. You can look at it here.
If you pin one of the last two pictures from this blog you can always find it later or you can go to the photo set and pin that. Hover the mouse over the image to see the pin button.
Comment options
Flickr
Happy Quilting and Crafting,
Val
