Showing posts with label mini quilts. Show all posts

Tuesday, November 24, 2015

Working on 'I Love My Cat' Applique Quilt


Thought I better bite the bullet and try to find some background fabrics for the cat quilt. I have been putting it off because I have lots of dark novelty prints and large patterns that are difficult to work with in a quilt. Great for tote bags though.

I have very few blenders or even light colours. I decided on a fairly dark background for this block because the lighter florals that I tried made the cat look a bit washed out.

Another thing I noticed is that I seem to have a smaller cat than the one in the magazine. I enlarged this pattern ages ago and probably had another use for it in mind. I just assumed I had the right size for the quilt. Never mind. I will make the other cats the right size. This block has some foot prints on it so it will fill up OK.

This cute quilt is by Lynette Anderson. See my first post about it.

Happy Quilting and Crafting,
Val

Wednesday, November 4, 2015

I Love My Cat Wall Quilt


I love this quilt by Lynnette Anderson. Earlier this year I tore out all the patterns I liked from my magazines and threw the magazines away. I kept out a couple of patterns that I thought I might try this year.

The pocket was in view just under my sewing machine and I kept looking at it. Then last week I pulled down my scrap box and moved the pocket to the top of the box. Yay! I had started.


Yesterday I put together a cat body and I feel very pleased with myself.


However, today I have found a bag making challenge for November with tutorials and tips and give aways. Over at Elm Street Quilts. I already have my eye on my zipper box and will use scraps to make a little pouch to enter in the competition this week. Well, that's the plan anyway.

Happy Quilting and Crafting,
Val


Tuesday, November 4, 2014

A Mat for Stumpy

When we moved into the new house I decided to retire my old dressing gown. It was tending to be used as a lap blanket mostly anyway. It was Stumpy's favourite.
Rather than just throw it away I cut it up and made a little blanket for Stumpy. My main motivation was him sleeping on my ironing board. I needed to make him a nice place behind my machine.


I cut the biggest rectangle I could get from the front then squared the corners. I cut 2 x 3" strips from some cat fabric. I measured the long side and cut two border strips to size and stitched them on. I then measured for the second two border strips. Such a simple thing, but I had to learn that making the opposite border strips the same length kept my quilt square.


The cat fabric had the cutest selvedge.


I used my trusty 505 basting spray. A few squirts along the borders and a few waves across the middle and press it neatly into place on the backing. I didn't use any wadding. I just cut a second piece of the dressing gown for the backing. No fancy FMQ for the cat. I stitched in the ditch of the borders.


I also stitched around the edges after trimming the backing. I made some single fold binding with my binding machine. So quick and neat. I don't roll it up. I just feed it through by hand and let it fall off the edge of the table as it comes out.


It fits behind my sewing machine. Well, close enough anyway. Now all I have to do is get Stumpy to use it instead of sleeping on the ironing board.


DH and I also worked on some Glassapplique business. We have found a lovely couple who visit all the weekend markets and they love our dichroic glass jewellery. We hope to have a healthy wholesale business with them. Here are some of the pendant sets we made. They are not fine art but they are great at the markets. I will get back to playing with the glass soon.


Happy Quilting and Crafting,
Val

Update:


Wednesday, December 11, 2013

Little Christmas bits 9

So many things to do. Sewing is only one of them so here I am behind still with the posting. I had a great time putting Michelle Ridgeway's Ginger Tea stitchery into a project. I like anything to do with tea and I love having fabric mats to put my teapots on while making tea. There are three new cute Christmas stitcheries for free on Michelle's side bar now.


My design process is a bit haphazard. I was looking for some background fabric and a cream layer cake piece just fell out of my homespun bundle. It was perfect. I looked through my floss for some ginger and spice brown thread. I opened my box of 'small fabric pieces' and three spicy pieces were just sitting there together so I pulled them out.

I did enlarge the original pattern a bit but I knew the stitchery was too small to feature by itself so I decided to put it towards the top of the square and settled on echoing the heart theme with some applique hearts underneath. Luckily my 'small' pieces were big enough to make the border too.

I am not big on taking time to quilt all my projects but this one needed something. I remembered I had a heart quilting design on my Quilt Pinterest board so I looked it up and copied it onto the mat. I used my pink chalk pencil to get it set out then went over it with the blue water washable pen. There is still a touch of pink there but a turn through the washing machine should fix that.


Instead of finishing this in one day I took two. I spent time looking at the travelling tea cosy show (from the 2010 Miles competition) at Beaudesert Community Centre. Not many cosies but fun to look at. Here are some.


Later I went on the hunt for some knitting needles and ended up in the Endeavour charity shop. Saved several dollars on knitting needles and bought a knitting pattern book. I still dream of knitting some nice jumpers and cardigans. We get at least 5 cold mornings here in winter. Then I went to Big W and bought season 2 of Covert Affairs. So I had to watch some of that too.

Two more small things on the go today so hopefully I will catch up.
I am having much more fun playing with all these small projects instead of finishing my Christmas quilt. I had to take a forced break from my North Pole quilt since we bought a block of land. I just can't afford more wadding and border fabric before Christmas but this means it will be back next year to be blogged about :)

...and if you don't have time to leave a comment on my many blog posts this month why not pin it (I have the hover pin button on my photos) and +1 it.

Happy Quilting and Crafting,
Val

Saturday, December 7, 2013

Little Christmas Bits 7

I really liked the little pieced santa coaster I made earlier and I couldn't find any patterns. It is not too hard to draw them up for paper piecing so I made a set of different sizes. I used the freezer paper method for piecing and found it very easy to use. I copied the block layout from a site for free patterns. There was only a photo of it. No pattern.


Download the diagrams I drew and make your own gaggle of gnomes. The PDF pages should print out at the right size.

Happy Quilting and Crafting,
Val

Tuesday, December 3, 2013

Little Christmas bits 2

I was pleased to finish my second Christmas item on time. However, it was dark when I did so I decided to wait until this morning to take the photo and do the post. I have chosen something smaller for today.
Tuesday's project was a pieced Santa face, also in my Pinterest Christmas ideas board. It is a free pattern with a cutting and sewing guide. The cutting guide required just enough brain power to make it interesting, with numbered fabric colours and cutting long strips in half. The sewing was easy except for the little hat triangles. It suggests finagling them but my points just weren't meant to match up.
I made him into a kitchen or table mat with retired bath towel on the back as all in one wadding and backing. The pattern says it is a 12" block but mine turned out 11" so I added some borders. I think he needed at least one border to make him look right. He would probably make a nice cushion cover too.

Here is the link to the Pieced Santa Face tutorial.

Here is mine. If you hover over the image you will see the pin button. Why not pin it for later.


Happy Quilting and Crafting,
Val

Friday, November 1, 2013

Quick Apron tutorial and a Gecko Mat with free gecko and leaf designs.


I picked up a couple of cute terry tea towels from Aldi that I new would make good somethings other than tea towels. This one is quick so there is nothing to download.

For the ties cut two 4" wof (from selvedge to selvedge) strips. I sewed then together to make one long strip. I left the selvedges on the tie ends. Make the ties by ironing in half then folding in the raw edges to the centre and folding in half again so the tie is 1" wide.

Sew right around close to the edges starting with the open edge.

Crease a fold in the tea towel then open it out and centre the tie against the fold line. Pin at each end to secure then fold over the tea towel. Pin for sewing.


Sew a rectangle starting along the folded edge about 1/4" in to secure the tie inside the folded tea towel. You are done.


Quick and easy.


Cute and small.

Practical.


What about a stunning gecko mat for the kitchen.


This fabulous gecko comes free from Fat Cat Patterns  I just printed it out and traced it in reverse. The line was dark enough to see through the paper when I turned it over. I had a colourful, tropical print and centred the fusible webbing cut out over the big flower. The background is  13" x 13".

I used machine buttonhole stitch to outline it. Then sprayed some decommissioned bath towel with basting glue and quilted it with some leaves I traced from the fabric.


I used my water soluble pink chalk pencil to draw them on the background.

I quilted, trimmed the edges and machine bound it with the matching tropical fabric.
My tutorial shows how I do the joining of the binding with a bias seam as well as more step by step.

You can pin this post for later.
 

Download the full mat tutorial from my Google Docs.
The leaves are fairly generic so even though I copied them from the fabric I don't think it will matter if I share the outlines here.
2 leaves jpg to download.
2 more leaves jpg to download.

I am linking up with Finish it up Friday at Crazy Mom Quilts this week.

If you visit why not leave a howdy comment. I like returning the visit if you have a blog.
You can comment on:

My Facebook page

My Flickr photo

or log into Google Plus to comment below.

Happy Quilting and Crafting,
Val

Saturday, January 26, 2013

FNSI - Monthly Mini Quilt


Last year I decided I wanted to make a mini quilt a month for 2013. The plan was to get it done early in the month, share the pattern and maybe inspire others but I have gotten off to a slow start. I have a lot of things on the go. February is on the drawing board and March is just in my head so I should be able to catch up soon.

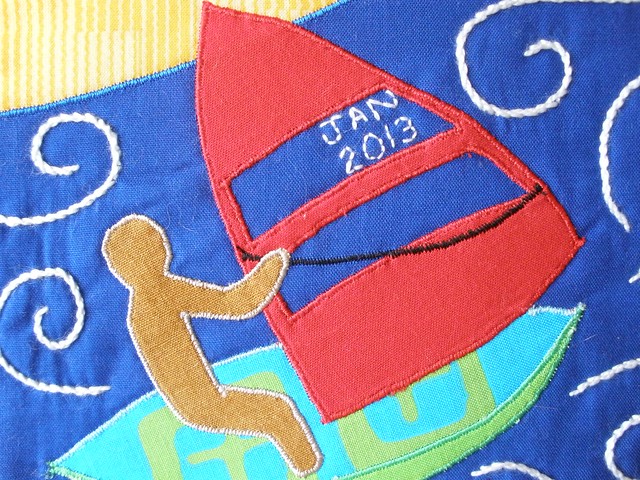
Last night for FNSI I put the finishing stitches on the waves and put a date on the windsurfer sail. There is a huge list of sewers joining in. Make sure you have a look.

This one is attached to a 12 inch canvas frame for now.
Just in case you can't work it out the picture represents the Gold Coast with Surfer's Paradise skyline and Coolangatta beach with that amazing expanse of sea that stretches to the horizon. DH and I love having lunch at the Coolangatta Surf Club and the view from there inspired this design.

Even though my first thought was to make separate mini quilts I have decided to leave them as unfinished blocks and sew 12 together into a quilt at the end of the year. That way I think I will enjoy it more. The finished blocks will be 12 inches. 

I wanted a way to share my projects but keep the stories separate so I have decided I will just do a new blog for each long term project and put a link to it on my sewing blog. I suppose there is a limit to the number of blogs one can have but I will just keep adding them til Blogger says no more. It just seems a very convenient way to keep a diary for my projects.

See my Year of Mini Quilts Blog for more details.

Unfortunately size matters so I suggest you 'save image as' . It is a jpg. You then insert it into your word processor and if need be reduce the margins of the page a bit then size the image so that the line of the edge is 25cm according to the page ruler.


I am linking up with Jan FridayNightSewIn

Happy Quilting,
Val

Sunday, December 23, 2012

A Year of MIni Quilts

I am so going to have to make a set of mini quilts next year after seeing these sets at Patchability .

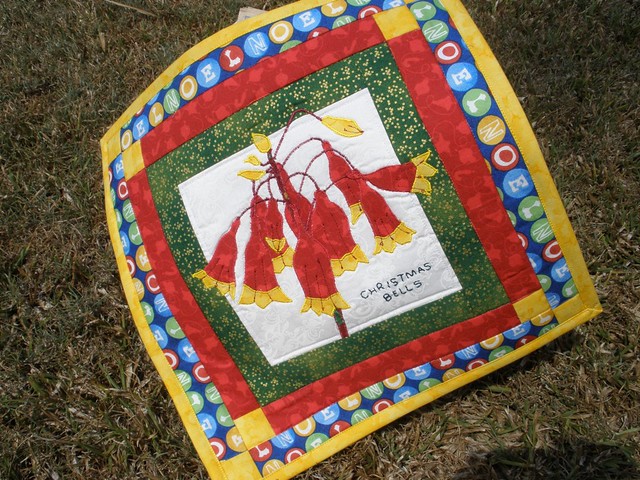
I was so excited I had to start with December. Besides, I had to make something with the fabric I bought on special last year.

I had a bit of trouble with the writing but I know I can improve it.

The pattern is not quite ready to go up but I will tidy it up for later. I have changed the flower head arrangement a bit so it looks more compact.

Christmas Bells are an Australian plant that flowers in the summer. I was intrigued by the powers attributed to it on this bushflower site


Happy Quilting and Merry Christmas,

Val


Related Posts Plugin for WordPress, Blogger...