Friday, November 30, 2012

A Dumpling Challenge ! Plus Update

What was I thinking!!! I have challenged the zipper purse queen to a zippy challenge. I discovered that Sandra from Suddenly Sandra has been wanting to make a dumpling purse for a while now. I too have been eying off the tutorial and doing dry runs in my sleep. I figured I just had to make the leap like I did with my Nanna's Farm quilt so the challenge is on.

We will be using the dumpling pattern from Michelle Patterns. It is a free PDF download pattern and a good tutorial.


Everyone is welcome to join in. We plan to make them this weekend but I am thinking a week may be a good idea. This challenge will be fairly low key since I know nothing about linkies. Perhaps this is a good time to learn and maybe there can be more zippy challenges in the future.

Update: On Friday 7th Dec I will do a post with a name linky so you can share a post about your dumpling.


Wednesday, November 28, 2012

WIP Wednesday - Nanna's Farm

Applique is my favourite thing. I have been drawing pictures a lot lately and letting my catnip quilt languish on the floor in the spare room. I don't understand what is holding me back. But instead of trying to work it out I have pulled out Nanna's Farm and made a leap of progress from tracing elements onto fusible webbing to actually cutting material.

I have been putting it off because I didn't have enough fat quarters from the fabric list but yesterday I pulled out the four pieces of beige fabric I had (the pattern calls for 15 different ones) and cut out the 11 squares for the first column arranging them so it looked like that's how it is meant to be.
All the quilt blocks are so pretty and I love the way the design was inspired by Patchwork Pumpkin's nanna's dairy farm.

This is how it looked yesterday. I sewed the squares together and added the bias stem. I ironed on the flowers ready to take to quilting group.


I used invisifil and blind hem stitch to sew on the stem.
This is how it looks today. All the flowers are stitched on with narrow satin stitch and the yellow centres have been ironed on.


It must have been weighing heavily on me that I hadn't made a start on this quilt because I feel much better now and feel energised ready to tackle the catnip quilt as well.

Here is a shop photo of the finished quilt.

And a few close ups.

I am sure no one will mind me giving Patchwork Pumpkin a plug. They are having a great sale in December - buy a pattern get 3 fat quarters free. I will be having a look for sure.

I am hoping to have lots more progress to show next week.

I am linking up with WIP Wednesday over at Freshly Pieced. 

I have also discovered WOW on Esther's blog and have linked up there.


Friday, November 23, 2012

A new skill. A new purse.

I bought one sew on coin purse frame at the Brisbane craft show and now I feel all sorts of patterns and applique designs bubbling up. My husband wants to make leather purses but I still like fabric. My first purse is made from Japanese cotton.


 I drew up the pattern and to make it special I appliqued a little kimono girl on the front.


One thing that I have found difficult is getting the purse to look perfectly symmetrical. Careful markings on the fabric should fix this so I can sew it perfectly.

Feel free to download the drawing image. I used felt for the face, hair and hands.
(I downloaded it to my desktop then opened my word processor and dragged it onto the page. It came out small size. Printing from 'preview' made it bigger).


Wednesday, November 21, 2012

Cockatoos and Christmas

Edit 2014 - Still planning :D

I have been busy designing some Australian summer Christmas decorations. I love the designing part but I don't really enjoy the sample making. At least I will have several cockatoos to hang on my Christmas tree as I refine the design. I am planning to try and sell them as PDF patterns on Etsy.


The sulphur crested cockatoo is a common sight around my place in the summer. There are tall tree all around my property and a flock of about 25 fly past regularly and take some time to perch and screech in the trees looking for food. They are quite a large majestic bird with a touch of the jester about them. Christmas in Australia is summer time and lots of birds are around.

I was having my breakfast tea when I spotted this one out my back door. He seems to have found a feast of seed pods in the grass.


Another of my favourites in the spangled drongo. It is a glossy speckled black bird with a deep notch in its tail. It is a migrant and turns up here in summer after spending winter up around Cairns. Several of them sit in the tree above our swimming pool and take turns diving and swooping in the water. They have an odd call a bit like a turkey gobble but not quite. It is maybe not the best choice for Christmas but certainly a good replacement for the crow or blackbird.

I think maybe a kingfisher or blue wren or a fig bird are next on my list for Christmas birds. Let me know if you have a favourite that turns up at your place in the summer. If you live in another country let me know if you have a favourite Australian animal or bird. I want to make a bit of a collection of designs for a variety of projects. But for now I have to get a couple of Christmas things finished to put in my shop before Christmas comes and goes.


Tuesday, November 13, 2012

A Tangle of Threads

I have been working on three different stitching projects and I just can't believe how highly charged those embroidery threads are. I put them down and zap! they form into a clump or a Tangle. A Tangle is the technical term for a group of embroidery threads and it takes quite a lot of rangling to sort them out.

A while back I posted about sorting out my embroidery threads with plastic display sleeves and a bit of paper and stitching. Well I have blessed the day I did that many times over when I have been looking for embroidery threads for a particular project. I thought it was about time to take stock and add my new threads to the system as well as tidy up the Tangle.

I put a piece of printer paper in the sleeve, sew it across the top opening then at one third intervals across and down. With my sharp little scissors I slit across each pocket a bit below the row of stitching. The point goes in easily and just slices across. Don't cut the paper. Make pockets on the back too.


All those little bits that are left over I roll up around my fingers and pop them in another sleeve. They stick to the plastic and stay in place quite well.


Ribbons Too
While doing that I thought it would be a good idea to straighten up all my ribbons too. So I divided each plastic sleeve into four sections. At first I just pushed the folded ribbon in but that was no good. I needed a spool to wind them on. I had a sheet of medium cardboard in the spare room and cut it into flat winders. To hold the end I used plastic paper clips that were just sitting in my drawer. It feels so good to be able to look at all my lovely ribbons now.

They went from a bag and a drawer and a box to a beautiful display folder.

Before

After
I put lots of photos and a description of what I did into a PDF that you can file away for a rainy day.


While writing this post my zippers arrived in the post. I am so excited. I will be checking my 'zippy things' board on Pinterest and start zipping up a storm :D
Don't they look fabulous. There must be a cool way to organise these babies.


Friday, November 9, 2012

Crows and Kitties


This project was started just before I entered my cockatoo phase so I had to keep going with the crows. I guess they are now blackbirds because I gave them yellow beaks. I love working with wool felt and wool fabrics to do applique. I also love the cute little designs that can be made out of felt. You can get so much detail.

On Pinterest I started up my 'I love felt' board to collect lots of cool felt projects for a rainy day. It always helps to have a bit of inspiration. I recently discovered the  Downeast Thunder Farm blog and lots of gorgeous felt bird patterns for free.

I was first introduced to the crazy wool pincushion by Kaaren at The Painted Quilt. And then Fiona at Bubz Rugs had a pincushion traveling swap. I was still feeling my way around blogland then :)
I still love using my international pincushion.

My latest creation has woven wool for the top and wool felt for the elements. I also used felt for the base and just cut a slit in it for turning and stuffing. I used baseball stitch to sew it up. I had a bit of rice and lavender mix in the draw so I popped in a few spoons of that then made it nice and plump with hobbyfill. I put in one of my washers to give it some weight and stitched the edges together.


If you would like to collect this pattern you can download it from google docs.
There is also a flickr photo stream with some construction steps.

I thought the kitty salt shaker should get a look in today. There is a ginger one for pepper but I don't use pepper much. I bought the pair in the Lakes District on my UK trip earlier this year.


Now I have to get busy and tweek the design and put in cockatoos instead of blackbirds and gum leaves instead of apples.


Wednesday, November 7, 2012

A Cockatoo and a Cup or Two

I have searched around on the internet a bit and there are just too many owls and kitties or pumpkins and crows or red cardinals and snowmen. I am going to make a bit of a statement about Australian themes regarding cute or seasonal or holidays by creating a variety of designs.

I have started on the flannel flowers but they are quite elegant and dignified so I have to work a bit harder on projects to go with the designs. I thought the cockatoo would lend itself to some more casual projects so to start with I have designed and made a cockatoo mug rug or teapot mat. I have the Andy Warhol inspired pot holder in the works too.


Download the pattern from google docs.

Also rather than fill the page with instructions I have made a flickr set here.

I thought he would feel at home with my cute teapot for one.


My morning was taken up testing the 6 sided pear pin cushion pattern. It looked tricky but was really quite easy so now I am ready to add the sweet flannel flower stitchery or applique to the pattern.

I put a big washer in the base to give it weight. I bought these at the hardware for this purpose.


Sunday, November 4, 2012

Aussie Autumn Theme


I had some left over triangles of fabric that I didn't use in my table topper but they were just too pretty not to make into something. Six pieces nicely makes a mug rug or candle mat size.

The colours meant that pumpkins and crows first popped into my head as decoration but it was at this time that I made a decision to look for Australian themes. Since the Eucalypt trees generally flower during spring and summer the gum nuts are an autumn feature. Using a public domain royalty free piece of clipart I created a circular pattern to stitch onto my mat. I would like to share my pattern with you so you can download it by clicking the image of the drawing and saving it.


Because I now have a new plan to help me choose fabrics I will be collecting colours that work well with Australian themes. Nothing like buying fabric to a plan. It means you can easily justify to yourself those huge purchases. (I don't really feel the need to justify my purchases to anyone else. ) The trouble with a new plan is that now I have to clear some of the bright and bold patterns already in the stash to make more room.
Lots of cushions and table cloths maybe, or tote bags and zippy things :)

Happy Quilting,
Val

Friday, November 2, 2012

A Kaleidoscope

What a roller coaster ride I had on the Wicked blog hop. I found so many wonderful blogs and I even found another Halloween blog hop! I will be signing up for more blog hops at Madam Sams.

I can't even remember how I found an amazing Russian blog. Maybe on Pinterest - but my Pinterest fun is a whole other story. Let me try and keep on track here.


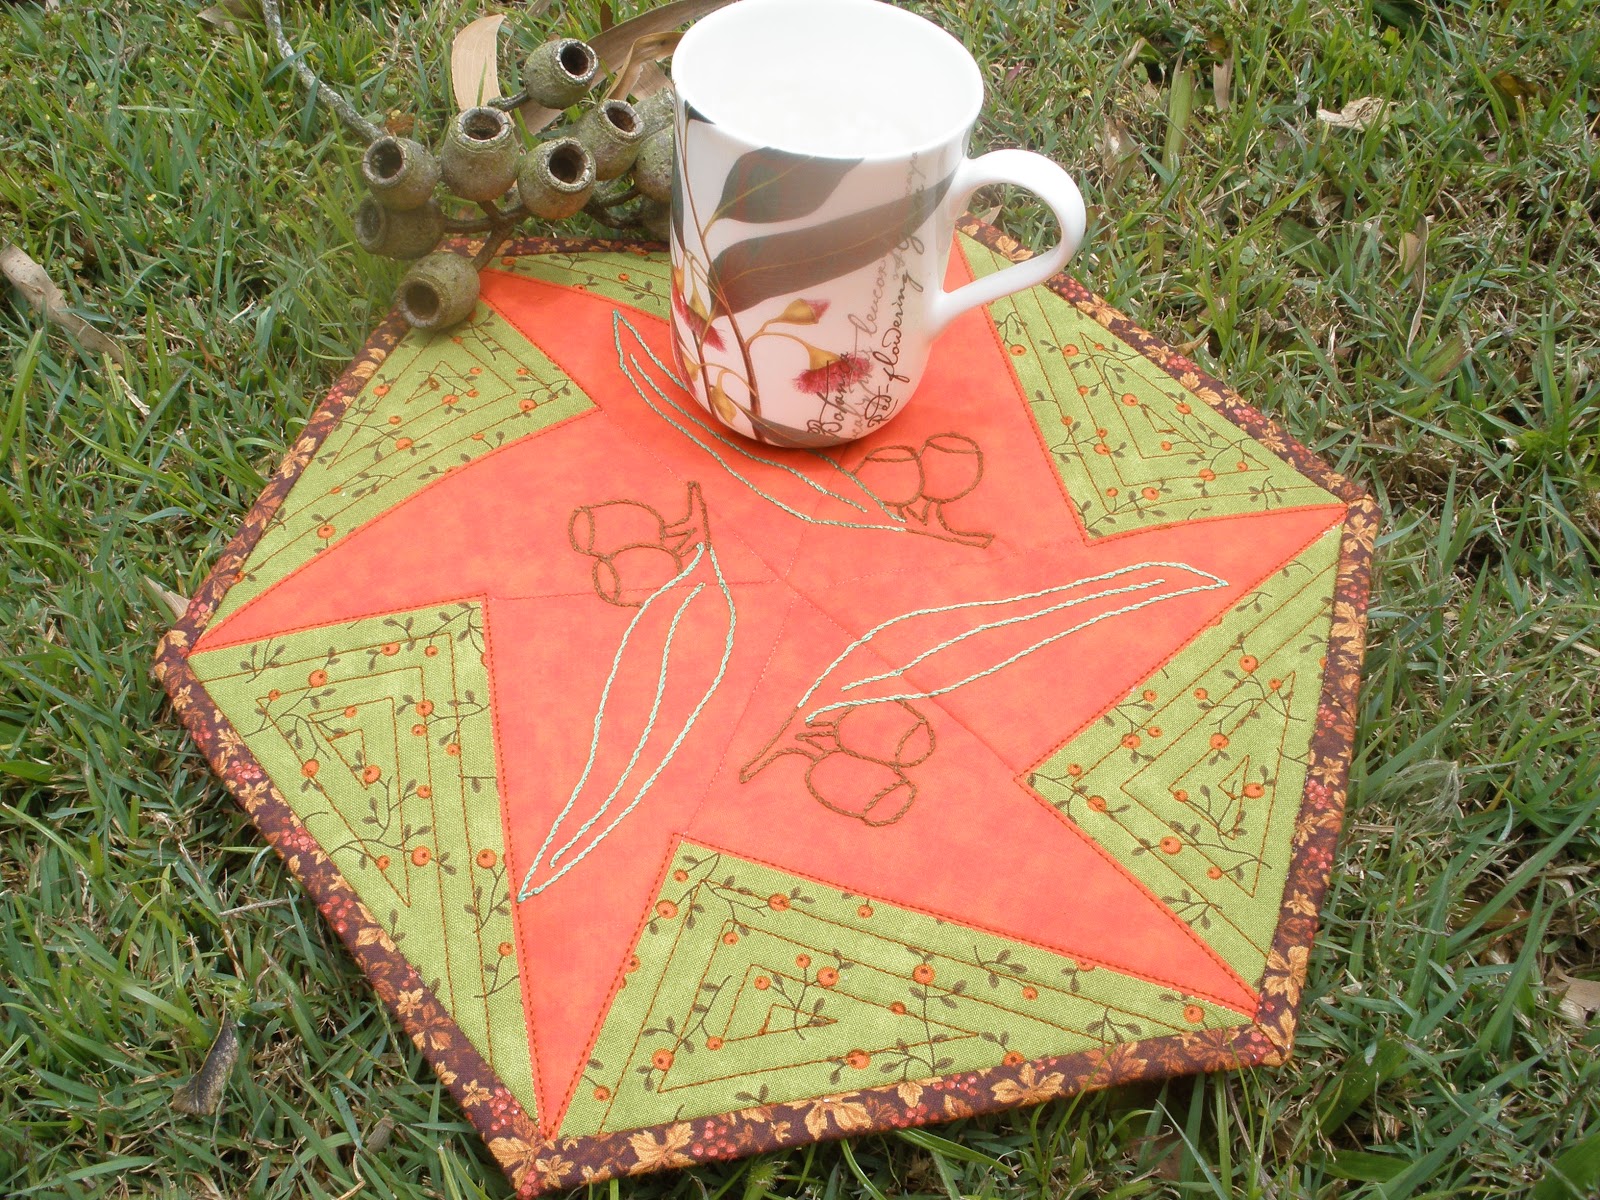
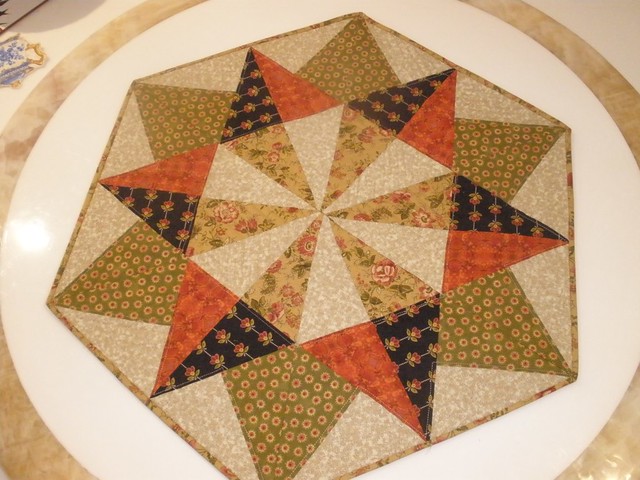
The Kaleidoscope Table Topper
Can't believe I have never noticed a pattern like this before.
I have this ridiculous fascination with the natural order of things and what could be more intriguing than making equilateral triangles from tubes and rectangles then jostling them around til a pleasant pattern forms. 

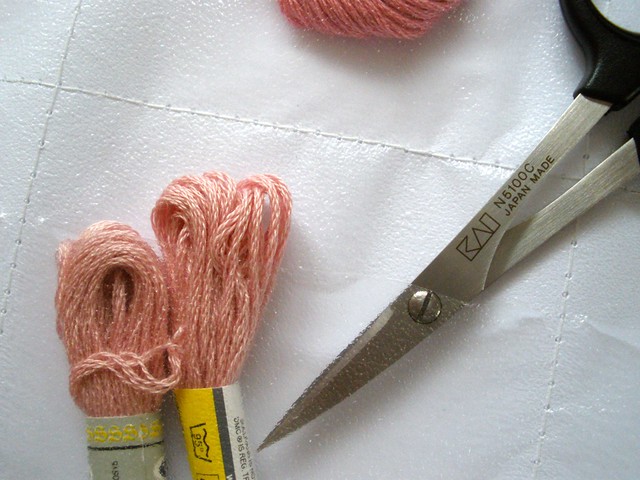
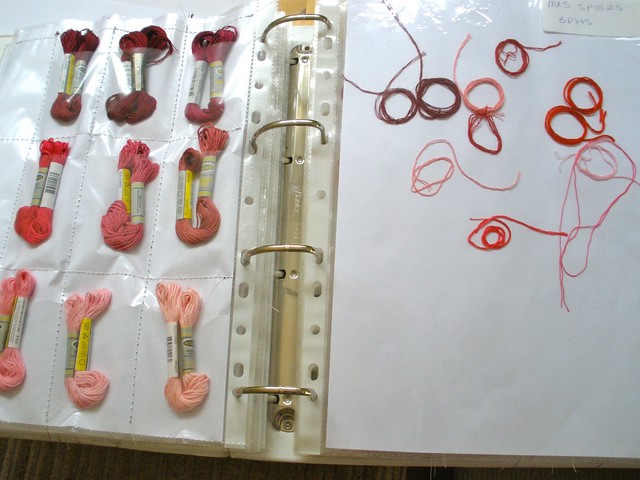
Choosing the right colour mix is pretty important as I found out. This topper has 12 dark attached to light fabric then 6 medium attached to dark fabric and 6 medium attached to light fabric for the centre. I am sure if you play around a bit there could be lots more amazing combinations.

The idea for my topper comes from http://roolen.blogspot.com.au/ 
Marina lives in Russia and I had to use Google translator to read her name but the projects speak for themselves. Her fabulous topper tutorial is here.
There is also a link to some further explanation about the equilateral triangles at Quilt studio
Marina has lots of tutorials and some great project ideas.

Here are the basic steps for the topper
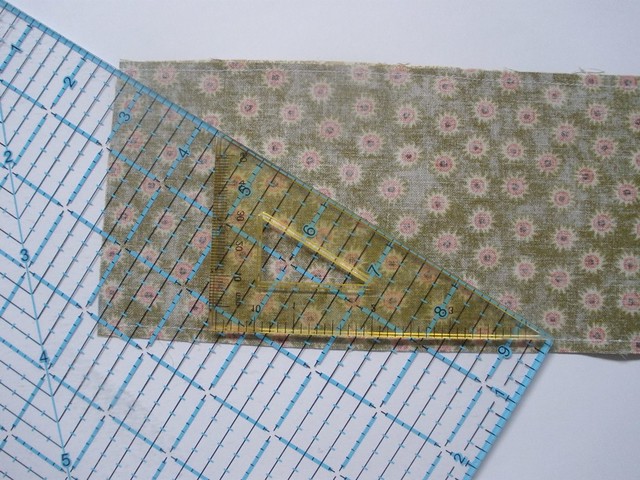
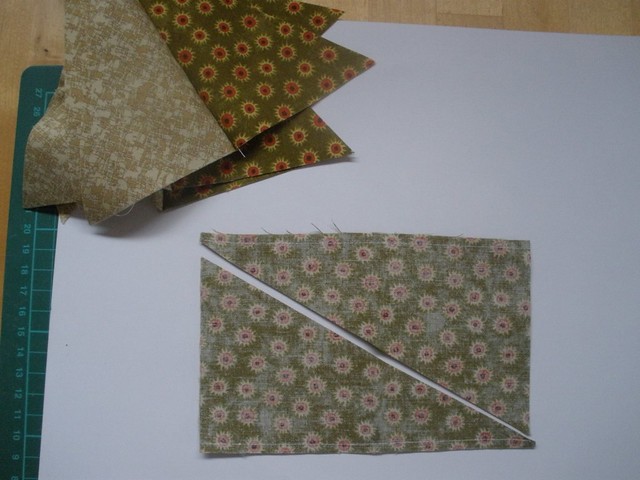
1. Choose your fabrics and cut out the strips. Mine are 9.5 cm wide (around 4 inches would do). Sew two strips right sides together on each long side with a 0.5 cm seam. 0.5 cm is in between 1/8 and 1/4 inch and my satin stitch foot is made for stitching 0.5 cm.

2. Work out a line that slopes at 30 degrees and goes from seam line to seam line. Mark where it comes to on the tube. This is how big to cut your rectangle pieces. Mine measured 16 cm. Cut 3 rectangles to get 6 triangles.


3. For the 12 dark and light triangles you need to make 6 with the dark on the right and 6 with the dark on the left. Cut 3 rectangles down from left to right and 3 rectangles down from right to left.


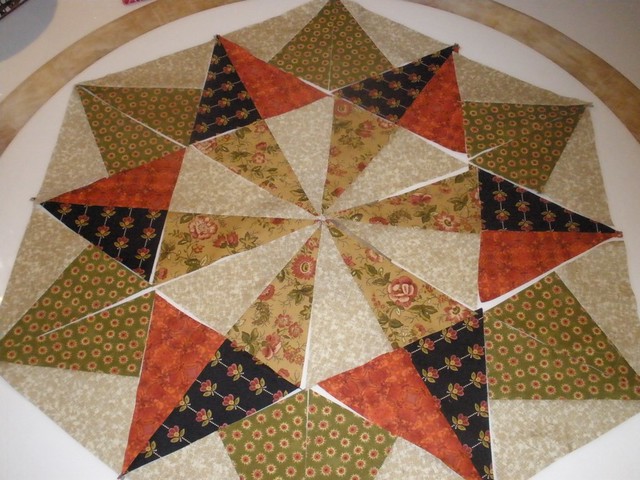
4. Cut all the triangles and I pressed the seams open. Play around to get a good look.


I settle on this one.


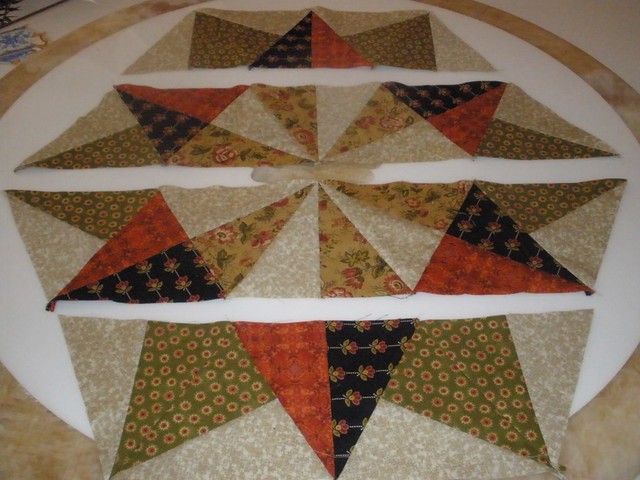
5. Sew the triangles to make 4 rows then sew them together.


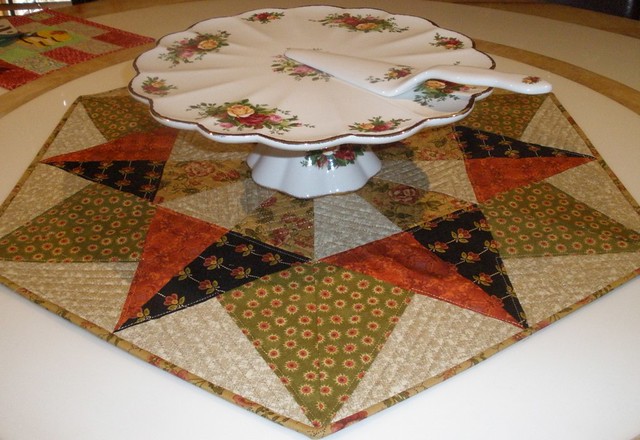
I didn't want to spend too much time quilting so I decided on some straight lines. I used one of the medium colour fabrics for the binding. I sewed it on the front, turned it to the back then on the front stitched in the ditch with nylon thread.


You can see the quilting here.
I love my new cake stand and cake slice
Sometimes I like to 'stitch outside the ditch'. Now I really should get back to the not nearly finished enough cat quilt.
image source

Any suggestions for some interesting short projects that you may have tried?  
I'd love to hear them.


Related Posts Plugin for WordPress, Blogger...