Showing posts with label table topper. Show all posts

Friday, November 1, 2013

Quick Apron tutorial and a Gecko Mat with free gecko and leaf designs.


I picked up a couple of cute terry tea towels from Aldi that I new would make good somethings other than tea towels. This one is quick so there is nothing to download.

For the ties cut two 4" wof (from selvedge to selvedge) strips. I sewed then together to make one long strip. I left the selvedges on the tie ends. Make the ties by ironing in half then folding in the raw edges to the centre and folding in half again so the tie is 1" wide.

Sew right around close to the edges starting with the open edge.

Crease a fold in the tea towel then open it out and centre the tie against the fold line. Pin at each end to secure then fold over the tea towel. Pin for sewing.


Sew a rectangle starting along the folded edge about 1/4" in to secure the tie inside the folded tea towel. You are done.


Quick and easy.


Cute and small.

Practical.


What about a stunning gecko mat for the kitchen.


This fabulous gecko comes free from Fat Cat Patterns  I just printed it out and traced it in reverse. The line was dark enough to see through the paper when I turned it over. I had a colourful, tropical print and centred the fusible webbing cut out over the big flower. The background is  13" x 13".

I used machine buttonhole stitch to outline it. Then sprayed some decommissioned bath towel with basting glue and quilted it with some leaves I traced from the fabric.


I used my water soluble pink chalk pencil to draw them on the background.

I quilted, trimmed the edges and machine bound it with the matching tropical fabric.
My tutorial shows how I do the joining of the binding with a bias seam as well as more step by step.

You can pin this post for later.
 

Download the full mat tutorial from my Google Docs.
The leaves are fairly generic so even though I copied them from the fabric I don't think it will matter if I share the outlines here.
2 leaves jpg to download.
2 more leaves jpg to download.

I am linking up with Finish it up Friday at Crazy Mom Quilts this week.

If you visit why not leave a howdy comment. I like returning the visit if you have a blog.
You can comment on:

My Facebook page

My Flickr photo

or log into Google Plus to comment below.

Happy Quilting and Crafting,
Val

Wednesday, March 13, 2013

Apple Patchwork and some spending

Since it is autumn here I wanted something nice to put on the table for our Easter feast. I love apples and they are a little bit less common in patchwork than other autumn themes. I looked around for some images and found this one on Flickr.

I have no idea what brand it might be so I rustled up a pattern with my trusty ruler and pencil based on the size of my table. I sorted through all my fabrics and came up with enough for four different blocks. Here is the first one.

I saw the cutest stitched alphabet from Michelle of Rag-Tag Stitchn' on another blog because they had won it in a give away Michelle had and I knew I just had to get it. It arrived today and it is lovely. I have to make some time to stitch up my own initial first.


I also gave in and ordered some fabrics in the equilters.com sale. 8 yds for a total of $68. This works out to about $9 per metre.

I made a mistake with the order because I didn't realise that my old card number was still on the account when I clicked pay. It came up declined and order waiting on payment. I updated my details but it didn't seem to work so I sent them an email. When they opened I got a quick email back saying the payment had gone through and then later in the day I got a nice email thanking me for my order and reassuring me that my details were updated successfully and the payment had gone through OK. I was very impressed with the friendly attention they gave me. I have bought from them several times now and feel confident to recommend them to others.

Equilter

I have also ordered two Lynette Anderson books from book depository uk . Other shops just can't compete. Each book was under $20 and when I looked up one of them on an Australian patchwork site it was $29 with postage on top of that. I try to buy close to home but I also don't want to throw away money.

Hope everyone is having fun with their sewing,

Val


Sunday, January 20, 2013

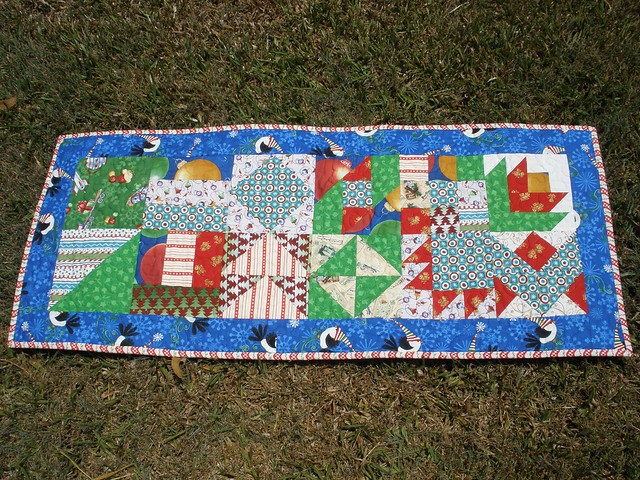
12 Days of Christmas Quilt


I have greatly enjoyed trying to design and make some new blocks to complete this runner. Because all the blocks had to be 6 1/2 inch unfinished I had to do a bit of trial and error with some of the triangles and I now have a better understanding of the various sized triangle or squares required for half square triangles.

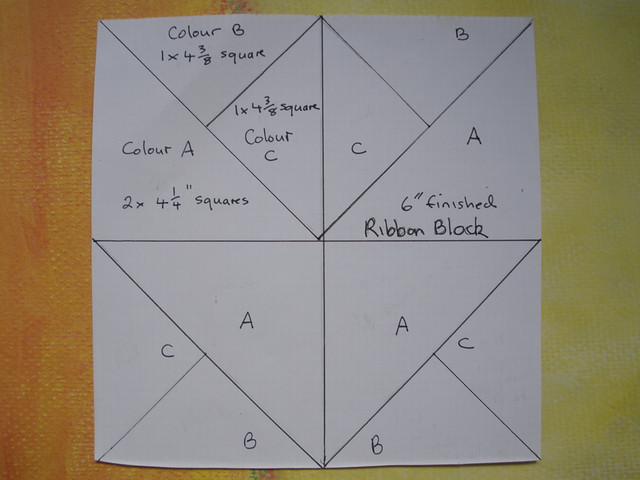
Classic ribbon block
This tutorial is for a 12 1/2 inch unfinished block
Required sizes for a 6 1/2 unfinished block:


Bear paw tutorial
One paw in this tutorial is a 6 1/2 inch unfinished block. It shows 4 put together.

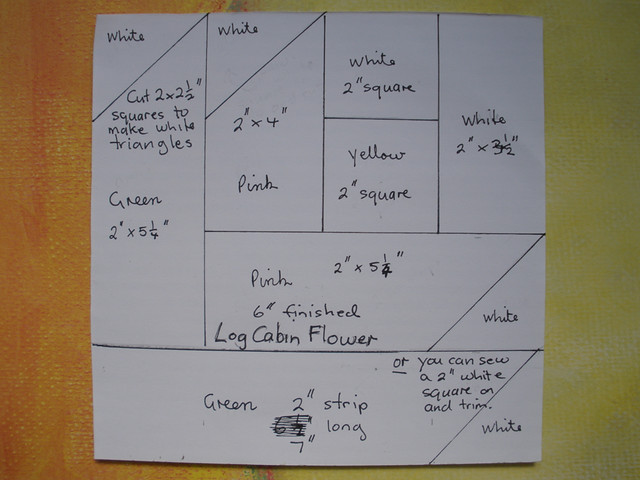
Log Cabin Flower block
Another favourite was the flower log cabin block. I can't find a tutorial for this one so here are some basic piece measurements.


I cross cut  2 1/2 inch squares to make the triangles then sewed as in the picture. The lengths of the strips that I have written in include enough for that extra bit on the right hand end.


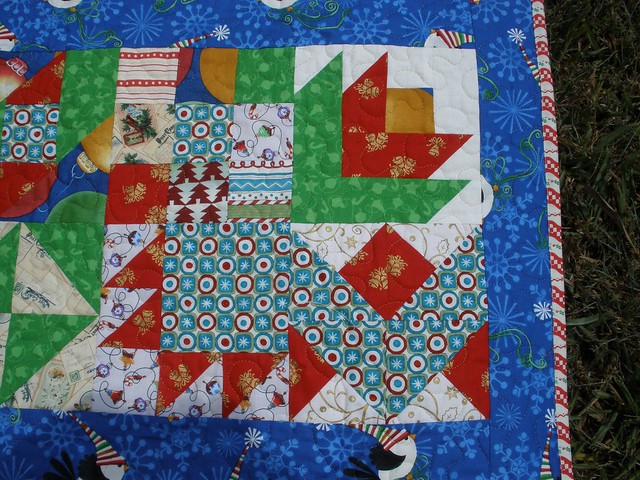
The flower block and ribbon blocks on the end.


My latest bit of fun has been exploring google plus a bit more than last time. I wanted a way for the North Pole QALers to communicate without having to write a blog post. We can start a thread and all have a say or just make an update report to everyone in the group with a few clicks.

Happy Quilting,
Val

Friday, November 2, 2012

A Kaleidoscope

What a roller coaster ride I had on the Wicked blog hop. I found so many wonderful blogs and I even found another Halloween blog hop! I will be signing up for more blog hops at Madam Sams.

I can't even remember how I found an amazing Russian blog. Maybe on Pinterest - but my Pinterest fun is a whole other story. Let me try and keep on track here.


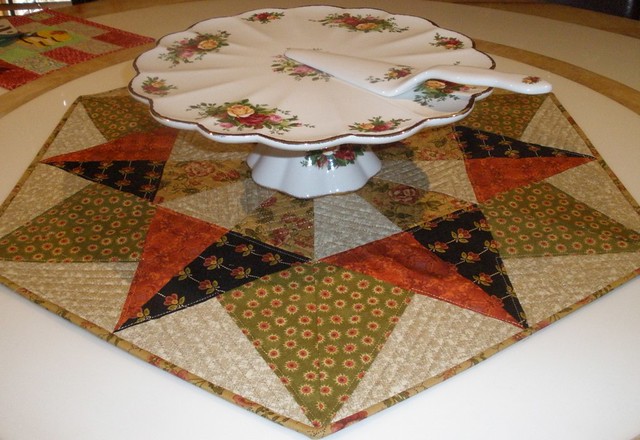
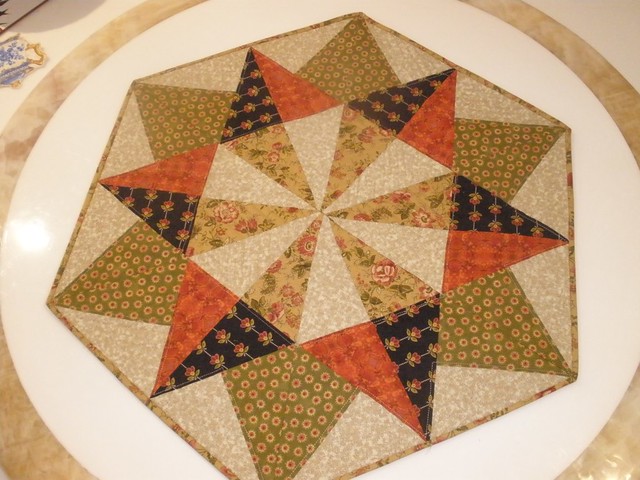
The Kaleidoscope Table Topper
Can't believe I have never noticed a pattern like this before.
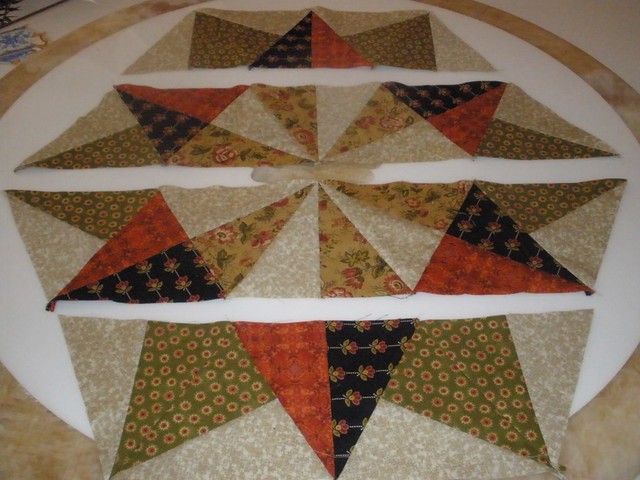
I have this ridiculous fascination with the natural order of things and what could be more intriguing than making equilateral triangles from tubes and rectangles then jostling them around til a pleasant pattern forms. 

Choosing the right colour mix is pretty important as I found out. This topper has 12 dark attached to light fabric then 6 medium attached to dark fabric and 6 medium attached to light fabric for the centre. I am sure if you play around a bit there could be lots more amazing combinations.

The idea for my topper comes from http://roolen.blogspot.com.au/ 
Marina lives in Russia and I had to use Google translator to read her name but the projects speak for themselves. Her fabulous topper tutorial is here.
There is also a link to some further explanation about the equilateral triangles at Quilt studio
Marina has lots of tutorials and some great project ideas.

Here are the basic steps for the topper
1. Choose your fabrics and cut out the strips. Mine are 9.5 cm wide (around 4 inches would do). Sew two strips right sides together on each long side with a 0.5 cm seam. 0.5 cm is in between 1/8 and 1/4 inch and my satin stitch foot is made for stitching 0.5 cm.

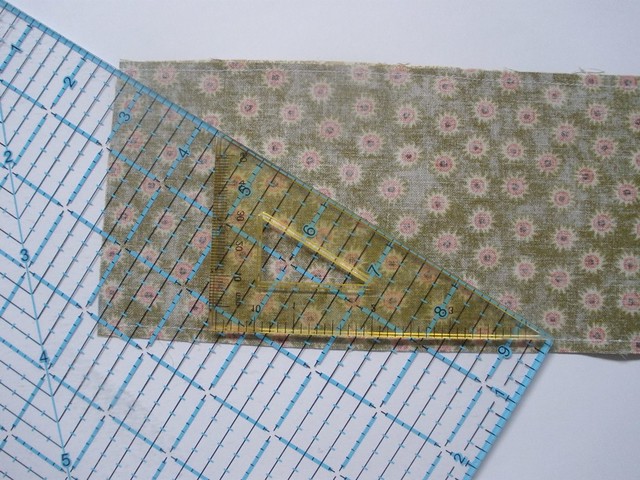
2. Work out a line that slopes at 30 degrees and goes from seam line to seam line. Mark where it comes to on the tube. This is how big to cut your rectangle pieces. Mine measured 16 cm. Cut 3 rectangles to get 6 triangles.


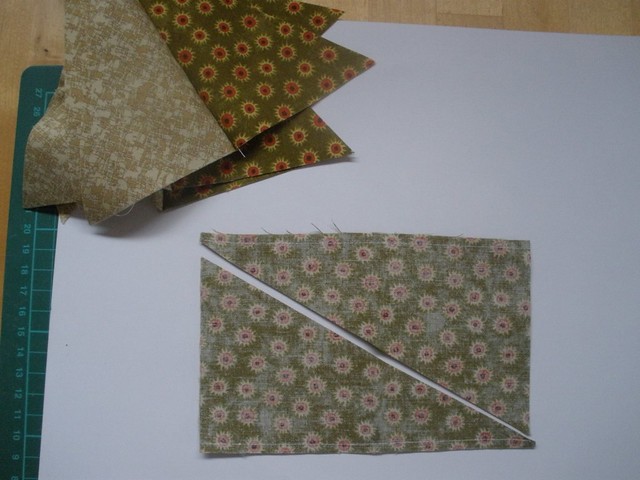
3. For the 12 dark and light triangles you need to make 6 with the dark on the right and 6 with the dark on the left. Cut 3 rectangles down from left to right and 3 rectangles down from right to left.


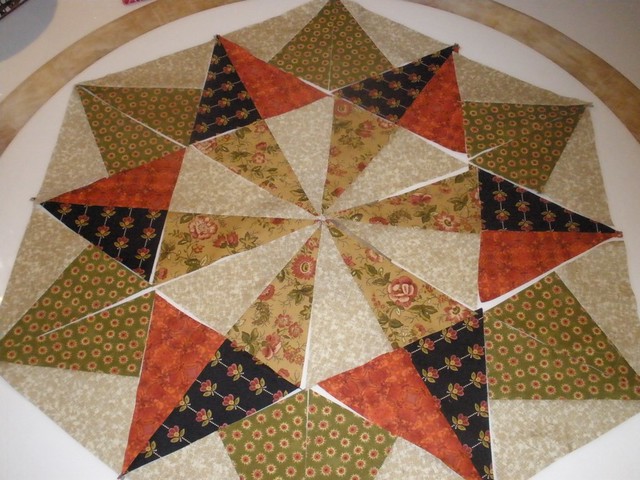
4. Cut all the triangles and I pressed the seams open. Play around to get a good look.


I settle on this one.


5. Sew the triangles to make 4 rows then sew them together.


I didn't want to spend too much time quilting so I decided on some straight lines. I used one of the medium colour fabrics for the binding. I sewed it on the front, turned it to the back then on the front stitched in the ditch with nylon thread.


You can see the quilting here.
I love my new cake stand and cake slice
Sometimes I like to 'stitch outside the ditch'. Now I really should get back to the not nearly finished enough cat quilt.
image source

Any suggestions for some interesting short projects that you may have tried?  
I'd love to hear them.


Wednesday, November 16, 2011

sewing strips

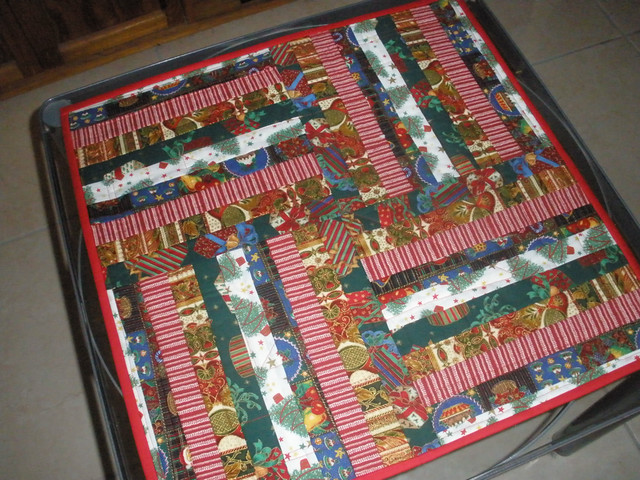
I saw a pattern for a folded pouch made from 1 1/2" strips and I just got the urge to sew strips. So I put together 10 width of fabric strips in Christmas fabric. I didn't really want a Christmas pouch so I cut it into 4 squares and made a table topper. So I could use it all year I made the backing with some of my NZ fabrics - the Tui's and matchng green.
My travel bag sits very patiently while I play.


I also saw that someone had done a lovely ribbon tree and thought that idea would be perfect for selvedges. I have drawn it up ready to do. I got side tracked with a stripy cat that just had to go first. I think it will go on a tea towel.

I drew the pattern on thin interfacing sewed on the strips then stay stitched around the outline and cut it out. I will use a bit of spray basting to hold it on while I stitch it on the tea towel. There is a tail and a stitched face to complete it.


 Mum and I had time to go and have morning tea up at Mt Tamborine at the Polish Gallery. There is a lovely view down the valley. It was a bit hot so not a good place to go in summer.


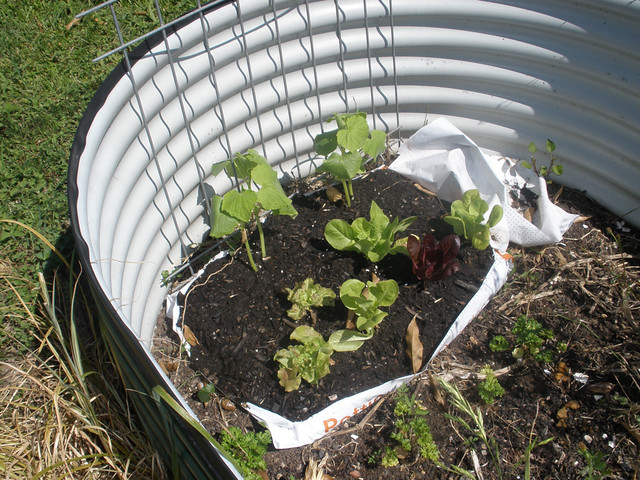
And finally here is the garden progress. When the cucumbers grow big I will train them back over the bed to keep the sun off the lettuce and maybe a capsicum. The sun is so fierce here all the veges can do with some shade.


Happy Quilting,
Val
Related Posts Plugin for WordPress, Blogger...