Showing posts with label free pattern link. Show all posts

Friday, January 9, 2015

Some UFO Finds and Finishes. Fabric Box Tutorial

As I continue to look through all my sewing boxes I have discovered some projects from quite a while back.
I had some pot holders and a double glove and two single gloves made with puppy fabric and I used wool fabric as the heat resistant insides. When they got too grubby and were a few years old I picked them apart to get the wool fabric out and started making them over with owl fabric. I finished the pot holders and one glove and nearly finished the double glove. I found the double glove again with the long piece in owl fabric and the two single pieces still with puppy fabric. I decided that out of the box and into the kitchen again was better than thinking about changing out the puppy fabric. It was a done deal when I found a good length of bias strip all ready to go in my little box of binding left overs.


Then I found a cute little scissor holder that I made several years ago. You can get the free pattern from my blog post of Jan 2012.
I used sticky velcro dots to velcro it to my sewing machine. I had to sew the dot on the fabric. Now I can look at it all the time.


Next was two sets of 10" squares ready to make into little boxes. The original boxes turned out very little but I decided to make these two a bit bigger so they would be more useful. I now have a pretty thread catcher and a reel saver (I tend to knock them off or they roll off). I like to have my most used cottons just next to me.


Start with two 10" squares and put interfacing on the back of each.


With right sides together stitch all around except for a gap on one side for turning. Press the seam allowance down along the gap. Trim the corners.


Turn and press.


Fold up and pin the gap side and the other side.


Stitch close to the edge.


Bag the corners. Measure down the seam lines from the corners 2 1/2" and put in a pin. I then ruled a line in pencil.


Stitch straight across the corners level with the pin.


Stitch along the edges at each corner.


Stitch along the bottom edges and this holds the bagged corner pieces flat.


I am thinking a strip of rick rack braid sewn around the top edge will look nice as well as make the top edge a bit firmer. I will do that when I find my rick rack braid. I found the ribbons but now I can't remember where the rick rack is. I am starting up a big box for ribbons and braids and laces. Soon they will all be in one place. Yay!

When I was looking for the carrot scissor holder pattern I realised that I have quite a few free patterns from over the years. Have a look through. Here is the link to all my posts with the label 'free pattern'.

Happy Quilting and Crafting,
Val


Friday, May 16, 2014

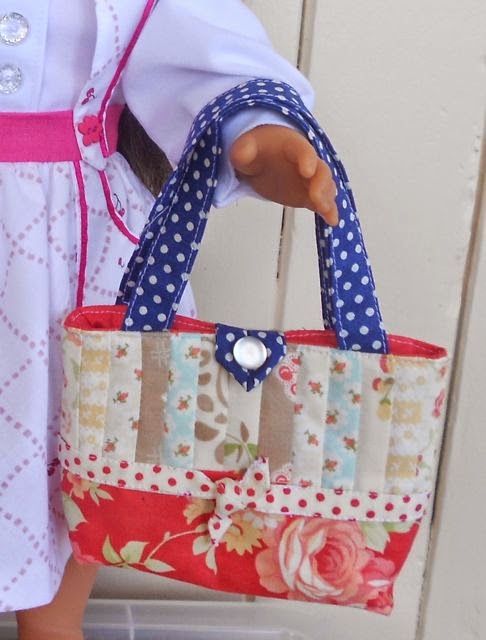
Make your 18" doll a patchwork tote

I found a link to this lovely tote bag made in regular size and thought it would make a cute doll bag. I wrote the pattern for an 18" doll size.
There is a mixture of inches and cm in the instructions because of the way I converted the measurements but a confident sewer should have no trouble with it.


The instructions for making the Moda Bake Shop bag may be useful for helping with the basic construction so I have included the link here.

Mill House Inn Tote Bag

Download you free instructions for the doll tote

Make sure you sign up for my newsletter. You get free patterns for 18"dolls and some tips on how to stay on top of things as well as interesting links. Of course, if you like a bargain you get some exclusive offers and first go at the sales.

Happy Quilting and Crafting,
Val

P.S. I don't have sales very often because I offer you my best price all the time. Visit my Etsy Shop for 18" doll clothes patterns and 20" doll clothes patterns that fit Australian Girl Doll.

Monday, April 14, 2014

Paper Pieced Bee


I downloaded this cute hexagon bee quite a while back. I printed it out and then forgot about it until I saw a post about it recently somewhere. Naturally I had to print it out again. I have no idea where I put it or where I saved the file on my computer. Luckily I had pinned the link to the free pattern when I saw it again.


Not quite sure what I will do with it or if I will make more.

If you don't have this pattern yet why not pin it before downloading it.
Thanks to Amy at Badskirt blog for this one.

I will be posting on 17th for the Super Power blog hop. It continues again today. You can see the list of blogs here.

If you like free patterns and digital papers and all sorts of crafty things and you don't mind signing your life away to register you might have a look at http://www.crafts-beautiful.com/free-downloads/templates. It is a craft magazine site that really want you to subscribe to their magazine but I can get past that because they had some lovely craft. I am just about to download a pattern for a cute felt mouse softy. Well worth a look.

Happy Quilting and Crafting,
Val

Tuesday, February 18, 2014

Some Sewing

I love to just pop in my sewing room and make something that I saw on the internet or make some new clothes. I haven't done much clothes sewing lately. I did buy that nice shell fabric before I left Brisbane and it is well on the way to being a blouse. I just need to get some interfacing from Spotlight tomorrow so I can finish it this week.


The other day I made a star dresden plate block that I saw on another blog. Phew! Just managed to find the link in my browser history. I was sure I saved it somewhere. You can find the tutorial at Snips Snippets blog .


I thought I would play at making a market bag that I might be able to sell at the Easter markets here this year. I wanted to see how fast I could make it. It is a simple bag that I made with homespun but it took me nearly and hour. I don't think they are a good item to make money on. Maybe if I could make 4 in a hour. Maybe I will try making some pot holders.
Anyway, here is the bag. It still needs a rinse and press to get the embroidery pen out properly. It is meant to fold up so I have to still put on the button loop and button.


I used the tutorial from Yarngeek

Here is a progress picture for our new house. I will be starting a new blog about the house soon but I am just really excited to have nearly got to signing the contract.


Nearly forgot. If you get a chance check out this BOM. The blocks look like old fashioned tiles. We have only missed one month and the Feb block is up now. Well worth a look.

Leave a comment on Pinterest if you are not into Google +

Happy Quilting and Crafting,
Val

Saturday, January 11, 2014

Just a little pouch

I have been so busy organising to move so I have just done a bit of sewing to try to relax. Nothing final on the sale yet but it all looks good.
When I found the little heart needle book there was a cute pouch on the same blog.
It was easy to make but even though I concentrated really hard when I put the binding on I still got the seam on the front of the pouch. I used regular double fold bias for this one. Since I burned myself out embellishing the heart needle book I decided to find a fancy closure for the pouch. I bought several flashy hooks and eyes and clasps when in America. I chose the giant hook and eye.


I expect to do a few more posts before going offline to move ( I am expecting to move) but after that I have my trip to Sydney with my mum so I will be pretty quiet for February. I am trying to keep up with the goals I set for Something old Something new but I doubt I will get to the something new this month. I also discovered the Christmas decoration sew a long so have to get a couple of felt cuties made in the next few days. Check it out.


Other comment options:
Flickr
Pinterest

Happy Quilting and Crafting,
Val

Tuesday, December 31, 2013

Oh Bother!

I have been doing some housework for mum lately. She was planning to 'get someone in' but I thought a bit of extra pocket money would be good. I don't think I could clean for strangers but it is nice to spend more time with mum. We chat a bit and then I stay for a cup of tea after. Yesterday I was trying to straighten up her craft room a bit and thought it would be a good idea to put some of her pop-up book collection on the shelf in the cabinet so it would get less dust. Trouble is I moved them from one side of the room to the other and the cabinet has glass doors so now they get more light. Oh bother! I popped a tea towel over them but it just doesn't look right.

In the afternoon I was in my sewing room and had a bright idea to make a shelf sheet with something nice on it. I had just enough white and then my eye fell on some book fabric that I had forgotten about. It was perfect.
I had to put a couple of seams in the white to get the right width and set about putting the book border on by rolling the white part up inside the folded book border (like making a border on a pillowcase). I carefully checked the the books would be the right way up after sewing but failed to notice that I had the white piece wrong side up. The books are upside down. Oh bother! I couldn't just turn it around because I didn't want the seams under the applique.

I wanted some bold and interesting letters so I chose these scrapbooking letters.
I inserted the ones I wanted into Pages and sized them all to 6cm high, printed them out and traced them from the back of the page. The lines showed through easily.

I hoped it would be OK but now I see the photo I cannot rest until I unpick it and put it right. It is being modelled on my shelf. There's my squirrel from Melbourne and my free cat pattern on a journal cover and just the top of the hand painted tile I got from Iron Bridge in the UK. I love my book shelves.


On a happy note I finished a little mug rug that had been sitting waiting for some had stitching. The pattern is the same as my free pincushion pattern enlarged a bit and made rectangular. I looked in my box of smalls (fabric pieces that is) to find some backing then dipped into the bag with the binding off cuts. A new tea or mug rug and a few less scraps.


Another souvenir, my mug from Edinburgh. 
If you don't 'do' Google plus why not comment in Flickr or Pinterest. Everyone must be into Pinterest at least. I get notified if anyone comments on one of my pins or just repins. I have been having such fun visiting all the boards of the people who have been repining from my boards.

Flickr
Pinterest

Happy Quilting and Crafting,
Val

Tuesday, December 17, 2013

Little Christmas Bits 17


Got up really early this morning and made two more pillow slips then wondered what I could make. I had the urge to make something for my 18 inch doll so I rustled through the Christmas fabrics for a piece big enough to make this cute pinafore dress. I even used up some of my ribbons.
I used the overlocker on narrow 3 thread to finish the edges then folded the narrow hems along the surging line. Made it easy. Small seams I didn't overlock and I only overlocked the waistband seams after I sewed them.


My 18 inch doll is from Aldi.
The pattern for this dress (Molly's pretty party dress) and many more are free at Doll Dress Patterns. They are American Girl patterns and even come with some historical stories.

If you are sick of leaving comments (because I am posting every day until the 24th) why not pin me or +1 me

Happy Quilting and Crafting,
Val
Related Posts Plugin for WordPress, Blogger...